Expenses
Adding an expense
Go to Expenses and tap the green + button.
Fill in four things and you're done:
- Title — what it was for. "Dinner at Trattoria", "Taxi to airport".
- Bill Total — the whole amount on the bill, not your share.
- Paid by — whose card or cash it came out of.
- When — date is automatically set to today unless you change it.
Then tap Save this expense.

Everything else on the form is optional. You can add a receipt, itemise the bill, change how it splits or set a category — all covered in the articles that follow — but an expense saved with just those four fields is a complete, correct expense.
The trip it belongs to
Every expense belongs to one trip, and Trip at the top of the form is already filled in. Which one you see auto-selected in the drop-down list depends on where you started:
- If the Expenses tab is filtered to a single trip, you get that trip.
- Otherwise you get your default trip — the one badged Default in the Trips tab.
- If you haven't set a default, you get whichever trip is top of the list.
Open a trip from the Trips tab and tick Set as my default trip, and the right one is shown every time you add an expense.
Check it before you save. The Trip box is locked once the expense is saved — it greys out with "Trip can't be changed after creation". An expense in the wrong trip throws that trip's balances out. If you add an expense to the wrong trips, you will need to delete it and enter it again in the right under the correct trip.
What happens next
Afer saving, the expense appears at the top of the Expenses list and everyone's balances update straight away. If you shared the trip, the others see it the next time they open the app.
The currency of an expense
Every expense is recorded in the currency the bill was actually paid in, and the exchange rate is set for good, unless you later edit the expense and manually change it.
The Currency dropdown automatically uses the currency set under the Trips tab, so most of the time there's nothing to do.
Spending somewhere else
Pick a different currency from the dropdown and the rate refresh to match the new currency. Only currencies the trip holds are offered — see More than two currencies to add one.
The rate is a snapshot
Under the amount you'll see Exchange rate (snapshot). The rate is filled in for you, but you can type over it if needed. Could be handy if your card gave you a worse rate than the market one and you'd rather the balances matched your statement.
Once saved, that rate belongs to that expense only. Changing the overall trip rate at a later date doesn't change a saved expenses exchange rate.
That's on purpose. A euro dinner in week one and a euro dinner in week three were bought at different rates, and your expenses should use the correct rate when the bill was paid.
A fresh rate on every expense PRO
Turn on Live rate for every new expense in the Trips settings and each new expense created from that point onwards will automatically look up that day's rate instead of inheriting the trip settings.
See Exchange rates.
Who paid the bill and who's already square
This is where you set who paid the overall bill and who paid their share at the time the billed was paid. Maybe someone in your group paid you directly for their share or maybe they paid the restaurant, either way, log the information in this section and Splitiz will continue to track who paid and who owes for the whole trip.
Paid by
Set one person as the main bill payer.
The paid by box is automatically filled with the name of the person creating the expense in their app. Chose from the dropdown to set someone else — whoever's card or cash the bill actually came out of.
Everyone else's share becomes money owed to that person which paid the bill.

The Paid tick boxes
Down in the split, each person has a Paid box next to their name.

Tick it for anyone who handed over their share of the bill at the time — the friend who put a tenner on the table, or paid the waiter for their own drinks.
- The name of the payer's box is ticked automatically against the name of the person set in the Paid by dropdown.
- A ticked person is counted as having paid their share and doesn't owe the bill payer (as set in Paid by) or anyone else for this expense.
- An unticked person didn't pay their share at the time the bill was paid and owes the bill payer (as set in Paid by).
Paying your own share is a tick in this box. Putting money toward someone else's share is a contribution — a different thing, and a different box.
The everyday case
One person pays the whole bill and settles up later: pick them under Paid by and leave every other box unticked. That's it.
Splitting an expense
Three ways to divide a bill. Pick whichever matches what actually happened.
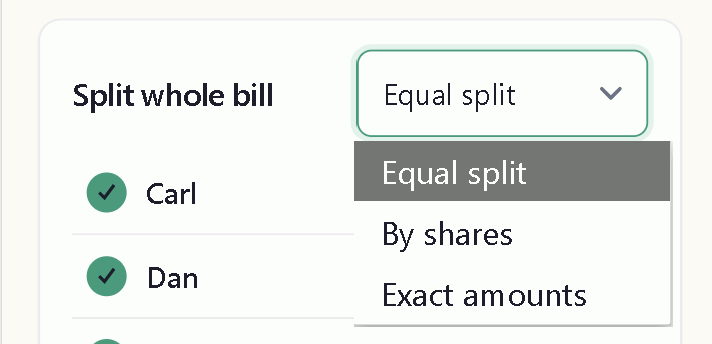
Equal split
The default, and what you'll use most of the time. The total is divided by however many people are ticked.
Untick anyone who wasn't there. If your trip consists of four people, but only two of you went out and ate at a restaurant, only tick the name of those two people that ate.
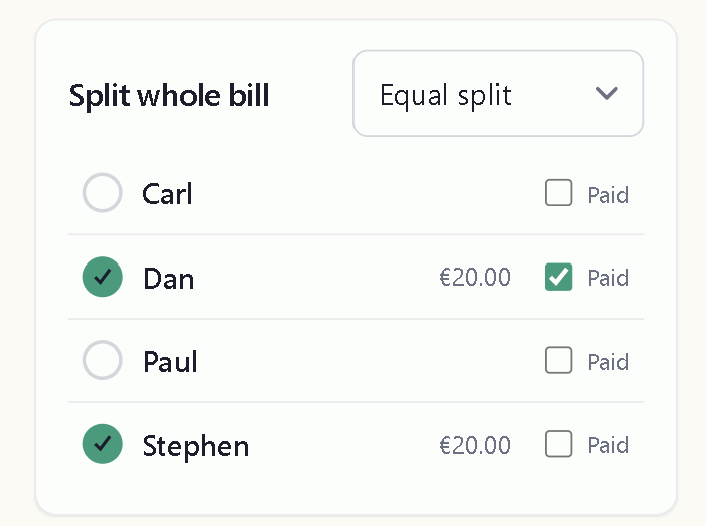
By shares
Give people a number of shares each. Someone on 2 pays twice what someone on 1 pays.
Good for a room one couple shares and one person doesn't, or the friend who drank all the wine.
| Person | Shares | Of a £120 bill |
|---|---|---|
| Alex | 2 | £60 |
| Sam | 1 | £30 |
| Dan | 1 | £30 |

Exact amounts
Type what each person owes. Use it when you already know the numbers and don't want them worked out for you.
The amounts should add up to the Bill Total. Splitiz tells you if they don't add up correctly.

Which to use
| What happened | Use |
|---|---|
| Everyone had roughly the same | Equal split |
| Two of you shared a room, one didn't | By shares |
| You've got the figures already | Exact amounts |
| Everyone had something different | Itemise it instead |
Changing the split type doesn't lose anything. Switch between them and until you chose one that works best.
Itemising a bill
When everyone had something different, or somone had the lobster and someone else only had a salad, split the bill line by line instead of lumping it together.
Turn on Manually itemise and split this bill and add a line for each item — a name and an amount.

Each line splits on its own
Tap a line and choose who had it. The steak goes to the two people who ordered it, the bottle of wine to the four who drank it, the lemonade to one person and so on.
Each line uses the same three split options as a whole bill — equal, shares or exact. So the round of beers which show on the bill as one line item can be split according to what everyone actualy drank. See Splitting an expense.
Don't itemise a bill where everyone had roughly the same thing. An equal split takes one tap and comes to nearly the same numbers.
Making it add up
Your lines items should come to the Bill Total entered at the top of the expense. Splitiz shows the difference if they don't add up, but still lets you save of you want to.
Discounts and money off
Put a discount in as a line with a minus amount — -4.50.
Assign it the same way you'd assign an any item: to everyone if the whole table got the discount, or to one person if it was their voucher or money off the just the food they ordered.
Turning it off
Switch the Manually itemise and split this bill toggle to off and the bill goes back to a single split without line items. Your lines are kept just in case you decide you do in fact want to itemise the bill and you turn it on again before saving. If the toggle is off and the expense is save, those line items dissapear for good unless you manually edit the expense and re-create them at a later date.
Contributions
For when somebody puts money toward someone else's share of the bill.
Open Contributions on the expense, tap + Add a contribution, and give it a name, an amount, and who handed the money over.

An example
Dan pays the whole £100 bill. Stephen puts £20 toward Carl's meal. This may pay for Carl's entire meal or Carl may still have to put some of his own money towards it.
- The £20 comes off what Carl owes for the Bill Total as he's received the contribution towards his meal from Stephen.
- The remaining £80 for the bill splits between everyone in the group as normal.
- Carl now owes Stephen £20.
- If Stephen already owed Carl money (as shown in the balances tab), the £20 contribution reduces that debt instead.
When it's useful
- At the end of a trip, when there's no next bill to even things out on.
- Settling something from outside the expense — the cash Carl handed over yesterday for something else entirely.
The one thing it isn't
Paying your own share of an expense is not a contribution. Tick the Paid box next to your name in the split instead to indicate that you have paid for that expense. See Who paid.
Getting these two mixed up is the most common way to end up with balances that won't settle. In normal circumstances, contributions should not be need to be made as part of a trip.
Contributions don't have to add up to anything. Whatever they don't cover is simply what gets split. Splitiz only warns you if they come to more than the bill, but you can still save.
Categories PRO
Tag an expense so you can see where the money is actually going.
Splitiz picks one for based on the expense title — type "Taxi to airport" and it is automatically categorised as Transport. Change it from the Category dropdown on the expense whenever it's guessed wrong.

The seven Categories
| 🍽️ Food & drink | 🛒 Groceries |
|---|---|
| 🚕 Transport | 🏨 Accommodation |
| 🎫 Activities | 🛍️ Shopping |
| 📌 Other |
That's the whole list and it can't be added to. A fixed set is what lets totals be compared between one trip and the next.
An expense doesn't have to have a category. Anything without shows as Uncategorised.
What you get for it
- A category chip on every row in the Expenses list.
- A Category filter and a running total, so you can total one kind of spending. See Finding an expense.
- The Where the money went card on the trip screen. See Where the money went.
Categorise as you go when creating the expense rather than at the end of the trip.
Receipts and scanning
Attach a photo of the receipt to any expense, and let Splitiz read it for you.
On the expense, tap Take a photo under Receipt.

Just keeping the photo
Take the photo and save. It's stored against the expense and anyone in the trip can open it — useful when somebody queries the bill three weeks later.
Attaching photos to a receipt is free, and there's a limit of 10 receipt photos a day on the free plan.
Reading the items off a receipt PRO
Turn on toggle Analyse and itemise this receipt after taking the photo, and Splitiz reads the receipt and fills in the line items for you — names and amounts, ready to be assigned to people in the group
One the receipt has been itemised and each line item added to the expense, you can go through and allocate who had what. See Itemising a bill.
Check the Bill Total before you save. Receipt scanning is good but not perfect, and a misread digit or missing line item is much easier to fix whilst creating the expense than after everyone's settled up.
Getting a good scan
- Flatten the receipt and photograph it straight on.
- Get the whole thing in frame, top to bottom.
- Bright, even light. Avoid your own shadow across the middle.
- A crumpled, curled or faded till roll will not scan properly and will misread items from the receipt.
What it fills in
Line items and their amounts, the total, and often the currency and a category. It won't know who had what — you will still need to allocate each person to the line items added to the expense.
If it can't work out the currency it says so, and leaves it on the trip default. Check the currency is correct and override from the Currency drop down list if needed.
Discounts
Money off comes through as a line with a negative amount. Assign the discount like any other line — to everybody if the whole table got it, to one person if it was specifically for their meal. See Itemising a bill.
Limits
On the free plan, scans are capped at 50 a month. You'll be told if you get near it. Ordinary receipt photos that are attached to an expense without performing the auto-analysis don't count toward that total.
Waiting for a signal
A photo needs the internet, both to upload and to be read. With no signal it waits and tells you.
Save the expense before closing the app. A photo you've attached but not yet saved won't still be there when you come back.
Unsaved drafts
Start an expense, get interrupted, and Splitiz keeps what you'd typed.
Unfinished expenses show at the top of the Expenses list under Drafts, with a Draft, please save badge. Tap one to carry on where you left off.
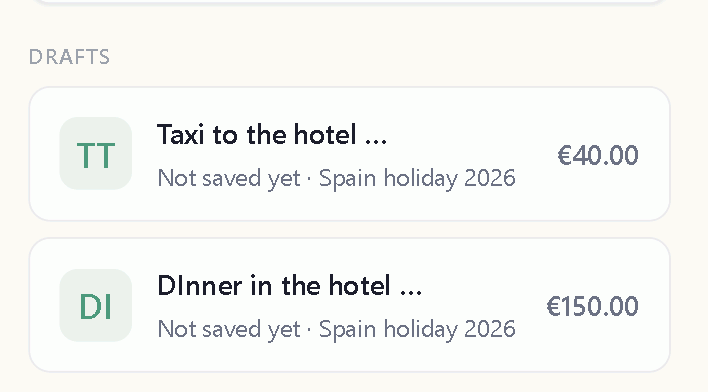
What a draft is not
A draft is not an expense. It's not in anyone's balances, nobody else in the trip can see it, and it isn't backed up anywhere. It's a note to yourself.
Nothing counts until you tap Save this expense.
They stay on one device
Drafts live in the browser on the phone or computer you started them on. Open Splitiz somewhere else and they aren't there.
Receipt photos aren't kept
A photo you've attached but not saved is held in memory only. Close the app and the draft expense will open without it.
If you've taken a photo, finish and save the expense there and then. Everything else survives being interrupted; the picture doesn't.
Getting rid of a draft
Open the draft and save it, or delete it from the same screen. Drafts don't expire on their own, so a list of them is worth a tidy now and then.
Finding an expense
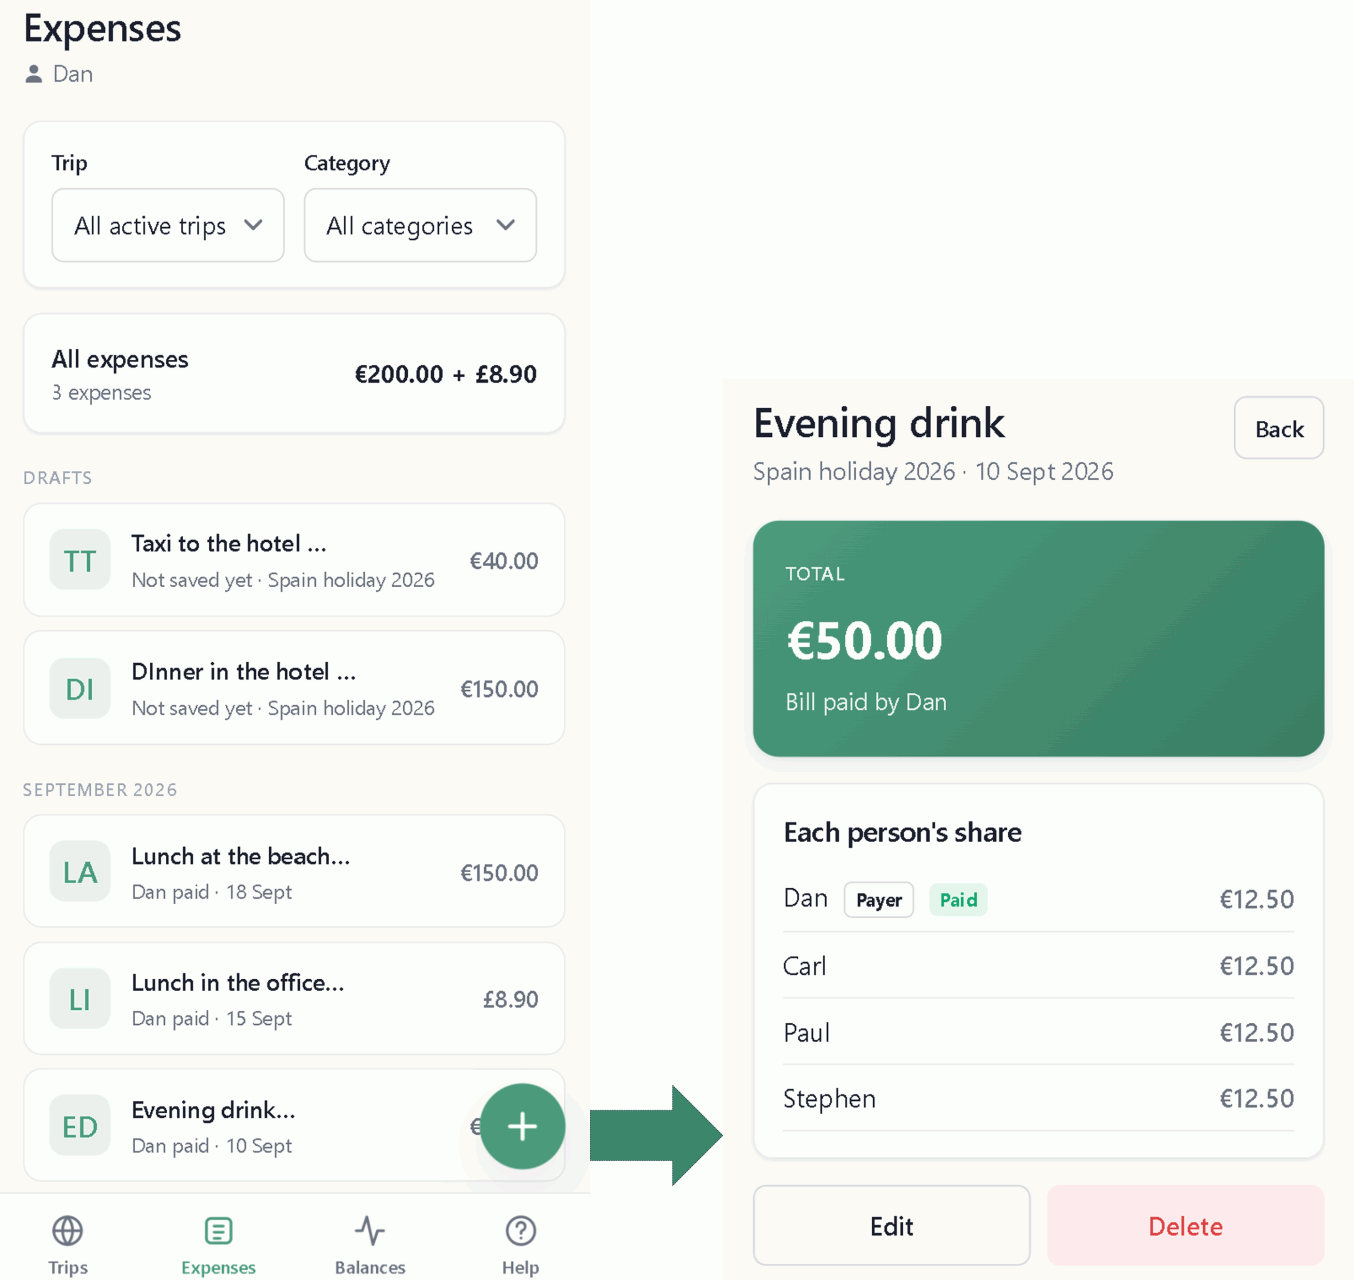
The Expenses tab lists every expense across all your trips, newest first and grouped by month. Tap any row to open it.

Narrowing the list
Two dropdowns sit at the top of the expenses tab.
Trip — one trip, or All active trips. Your default trip is picked automatically when you open the tab, and sits at the top of the list.
Category PRO — select a specific category, or Uncategorised.
The running total
Just above the list you get a total for whatever the filters are showing:
> 🍽️ Food & drink — 3 expenses · €200 + £8.90
That's the whole group's spending, not your share — it adds up all the bill totals for all of the expenses below.
This is how you answer "how much did we spend on taxis?" Set the trip, set the category, read the total.
Several currencies at once
Totals are never converted. Show a trip with EUR and GBP expenses and you'll see €200 + £8.90 so you know how much you've spent in each currency.
To get the totals in a single currency, use the Converted tab in Balances. See Original and Converted.
What each row tells you
The title, the category if it has one, who paid, the date, and the amount and the currency the bill was paid in. With All active trips showing, the trip name is on the row too.
Changing or deleting an expense
Open the expense from the Expenses tab and tap Edit.
Everything can be changed — the amount, who paid, the split, the date, the category, the receipt. Save, and everyone's balances move to match straight away.
Who's allowed
Anyone in the trip can see any expense.
Only two people can change an expense:
- Whoever added the expense can change their own expense
- The trip owner, can edit any expense in their trip, regardless of who added it
Spotted a mistake in someone else's expense? Ask them to fix it, or ask the trip owner. There's no way to correct it yourself.
Deleting
Edit → Delete. You'll be asked to confirm.
It's gone for good, along with its receipt photo and line items. Balances are updated when an expense is deleted and balthere's no undo button - when an expense is deleted, it's gone for good.
When you'd delete rather than edit
- It was added to the wrong trip. An expense can't be moved between trips — delete it and add it again in the right one.
- It's a duplicate, because two of you entered an expense for the same dinner.
Already settled up?
Deleting an expense that's already been paid off (settled) leaves the payment recorded against a debt that no longer exists, and someone ends up looking overpaid. Aviod deleteing expenses just becasue it's been paid off. See — see Settling up.